- When prying with a flat-tip screwdriver, wrap it with protective tape, and apply protective tape around the related parts, to prevent damage.
- Take care not to scratch the dashboard and related parts.
- Remove the dashboard centre lower cover (see page 20-77).
- If equipped, make sure you have the anti-theft code for the radio, then write down the frequencies for the preset buttons.
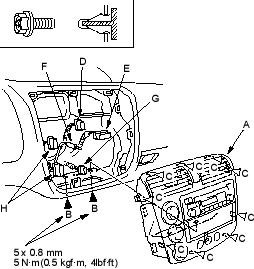
- Remove the centre panel (A). LHD is shown, RHD is symmetrical.
- Remove the bolts (B) from the dashboard centre lower cover opening.
- Gently pull out along the bottom to release the lower clips (C), then along both sides and top to release the remaining clips (C).
- Disconnect the hazard warning switch connector (D), audio unit connector (E), antenna lead (F), heater switch connector (G), and climate control unit or heater control unit connectors (H).
| Fastener Locations | |
B  : Bolt, 2 : Bolt, 2 |
C  : Clip, 9 : Clip, 9 |
- Install the panel in the reverse order of removal, and note these items:
- Make sure each connector is plugged in properly and antenna lead is connected properly.
- equipped, enter the anti-theft code for the radio, then enter the customer's radio station presets.
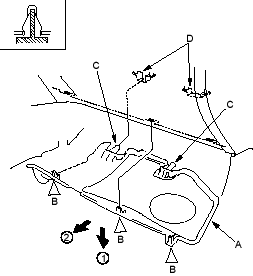
- Remove the passenger's dashboard lower cover (A). LHD is shown, RHD is symmetrical.
- Gently pull down the edge nearest the glove box to release the clips (B).
- Pull the cover away to release the pins (C) from the holders (D).
| Fastener Locations |
B  : Clip,3 : Clip,3 |
- Install the cover in the reverse order of removal.

