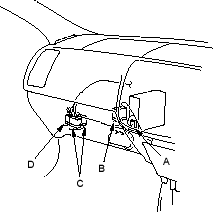
Passenger's side:
- From under the dash, disconnect the ECM/PCM connector (A), EPS sub wire harness connector (B), passenger's door wire harness connectors (C), side turn signal light connector (D) (for some models) and antenna lead (E) (LHD).
LHD:

RHD:
- Detach all of the harness and connector clips.
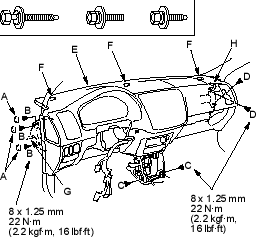
- From outside the driver's door, remove the caps (A), then remove the bolts (B, C, D), and lift up on the dashboard (E) to release it from the guide pins (F, G) and hook (H). LHD is shown, RHD is symmetrical.
| Fastener Locations | ||
B  : Bolt, 3 : Bolt, 3 |
C  : Bolt, 2 : Bolt, 2 |
D  : Bolt, 2 : Bolt, 2 |
- Carefully remove the dashboard through the front door opening.
- Install the dashboard in the reverse order of removal, and note these items:
- Make sure the dashboard fits onto the guide pins correctly.
- Apply liquid thread lock to the dashboard mounting bolts of the middle portion before reinstallation.
- Before tightening the bolts, make sure each wire harness is not pinched.
- Make sure the connectors are plugged in properly, and the antenna lead and air hose (auto A/C) are connected properly.
- If equipped with airbag, reconnect the negative cable to the battery.
- If equipped, enter the anti-theft code for the radio, then enter the customer's radio station presets.

