- Disconnect the 7P connector from the recirculation control motor.

Incorrectly applying power and ground to the recirculation control motor will damage it. Follow the instructions carefully.
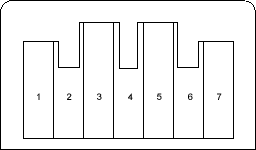
- Connect battery power to the No. 1 terminal and ground the No. 5 and No. 7 terminals; the recirculation control motor should run smoothly. To avoid damaging the recirculation control motor, do not reverse power and ground. Disconnect the No. 5 or No. 7 terminals from ground; the recirculation control motor should stop at Fresh or Recirculate. Do not cycle the recirculation control motor for a long time.
RECIRCULATION CONTROL MOTOR
- If the recirculation control motor does not run in step 2 remove it, then check the recirculation control linkage and doors for smooth movement.
- If the linkage and doors move smoothly, replace the recirculation control motor.
- If the linkage or doors stick or bind, repair them as needed.
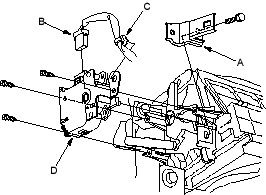
NOTE: LHD type is shown, RHD type is symmetrical.
- Remove the ECM/PCM (see page 11-3).
- Remove the bolt and the bracket (A). Disconnect the 7P connector (B) and the harness clip (C) from the recirculation control motor (D). Remove the self-tapping screws and the recirculation control motor from the blower unit.
- Install the motor in the reverse order of removal. After installation, make sure the motor runs smoothly.

