- Remove the dashboard (see page 20-215).
- Remove the blower unit (see page 21-55).
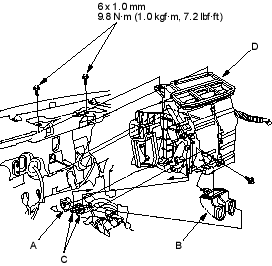
- Disconnect the drain hose (A), then remove the mounting bolts, the heater outlet (B), the connectors (C) and the heater unit (D).
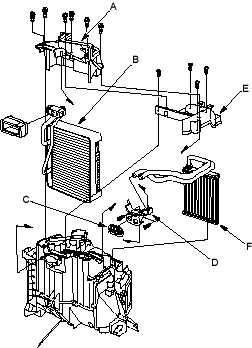
- Remove the self-tapping screws and the expansion valve cover (A). With air conditioning; carefully pull out the evaporator core (B) so you do not bend the inlet and outlet pipes. Remove the grommet (C), then remove the self-tapping screws and the flange cover (D). Remove the self-tapping screws and the pipe cover (E), then carefully pull out the heater core (F) so you do not bend the inlet and outlet pipes.
- Install the heater core and the evaporator core (with A/C) in the reverse order of removal.
- Install the heater unit in the reverse order of removal and note these items:
- Do not interchange the inlet and outlet heater hoses and install the hose clamps securely.
- Refill the cooling system with engine coolant (see page 10-8).
- Be sure to connect the drain hose securely.
- Adjust the heater valve cable (see page 21-62).
- Make sure that there is no coolant leakage.
- Make sure that there is no air leakage.
- Enter the anti-theft code for the radio, then enter the customer's radio station presets.
- With air conditioning, refer to evaporator core replacement (see step 6 on page 21-86).

