|
|
If accidental system discharge occurs, ventilate work area before resuming service.
Additional health and safety information may be obtained from the refrigerant and lubricant manufacturers.
- After the leak test, check that the high-pressure valve is closed and start the engine. Run the engine below 1,500 rpm (min-1).
THREE VALVE GAUGE
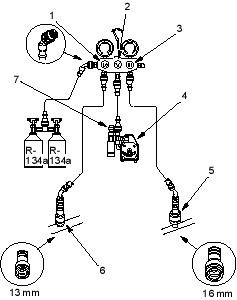
- LOW-PRESSURE VALVE
- EVACUATION VALVE
- HIGH-PRESSURE VALVE
- VACUUM PUMP
- HIGH-PRESSURE QUICK JOINT
- LOW-PRESSURE QUICK JOINT
- CHECK VALVE
TWO VALVE GAUGE
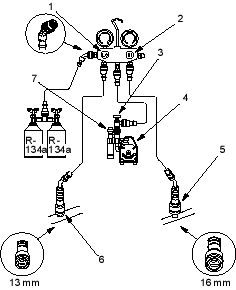
- LOW-PRESSURE VALVE
- HIGH-PRESSURE VALVE
- EVACUATION STOP VALVE
- VACUUM PUMP
- HIGH-PRESSURE QUICK JOINT
- LOW-PRESSURE QUICK JOINT
- CHECK VALVE
- Open the front doors.
Turn the A/C switch ON.
Set the temperature control dial on MAX COOL.
Set the mode control switch on VENT.
Turn the fan switch on MAX.
- Open the low-pressure valve and charge with R-134a refrigerant.
 WARNING
- Do not open the high-pressure valve.
- Do not turn the cans upside down.
- Charge the system with refrigerant capacity. Do not overcharge the system; the compressor will be damaged.
Refrigerant capacity:
500 to 550 g (17.6 to 19.4 oz)
- When fully charged, close the low-pressure valve and the refrigerant cans. Check the system.
- Stop the engine and disconnect the charge hose quickly.
- Check the system for leaks using a leak detector proper to refrigerant R-134a. Particularly check for leaks around the compressor, condenser and receiver/dryer.

