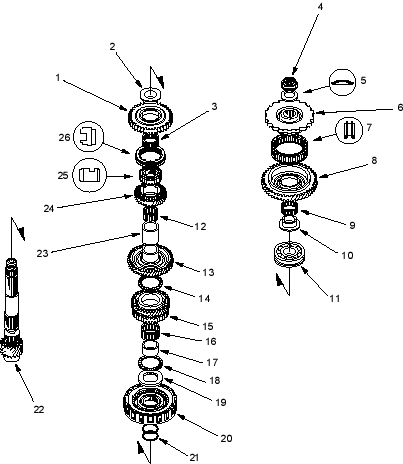
Shafts and Clutches

Countershaft Disassembly, Inspection and Reassembly

14-195  

  1. Remove the locknut and take off components down to the reverse selector hub.
    1. REVERSE GEAR
    2. REVERSE GEAR COLLAR
    3. NEEDLE BEARING
    4. LOCKNUT (FLANGE NUT)

      23 x 1.25 mm, 103 Nm (10.5 kgf/m, 75.9 lbf/ft) – 0-103 Nm (10.5 kgf/m, 75.9 lbf/ft)

    5. CONICAL SPRING WASHER

      Replace

    6. PARK GEAR
    7. ONE-WAY CLUTCH
    8. 1ST GEAR
    9. NEEDLE BEARING
    10. 1ST GEAR COLLAR
    11. TRANSMISSION HOUSING COUNTERSHAFT BEARING
    12. NEEDLE BEARING
    13. 2ND GEAR
    14. THRUST NEEDLE BEARING
    15. 3RD GEAR
    16. NEEDLE BEARING
    17. 3RD GEAR COLLAR
    18. THRUST NEEDLE BEARING
    19. SPLINED WASHER
    20. 3RD CLUTCH
    21. O-RINGS, Replace
    22. COUNTERSHAFT
    23. DISTANCE COLLAR, 28 mm

      Selective part

    24. 4TH GEAR
    25. REVERSE SELECTOR HUB
    26. REVERSE SELECTOR
  2. Remove the reverse selector hub and 4th gear (see page 14-196).
  3. Inspect the thrust needle bearing and the needle bearing for galling and rough movement.
  4. Inspect the splines for excessive wear and damage.
  5. Check shaft bearing surfaces for scoring and excessive wear.
  6. Lubricate all parts with ATF during assembly.
  7. Check the clearance of the 4th gear.
  8. Before installing the O-rings, wrap the shaft splines with tape to prevent O-ring damage.
  9. Install the reverse selector hub, reverse selector, one-way clutch and conical spring washer in the direction shown.