- Raise the glass fully.
- Remove these items:
- Disconnect the cylinder rod from the lock cylinder (see step 3 on page 20-8), and disconnect the outer handle rod from the outer handle (see step 6 on page 20-9).
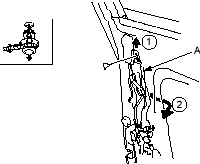
- If applicable, remove the clip, and remove the lock rod protector (A) in the numbered sequence.
Fastener Location  : Clip, 1
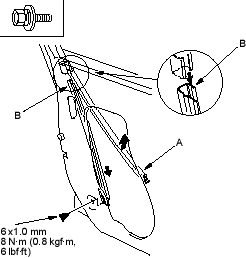
- Pull the glass run channel (A) away as necessary, and remove the bolts, then remove the centre lower channel (B) by pulling it downward.
Fastener Location  : Bolt, 1
- Disconnect the actuator connectors (A) (for some models), and detach the inner handle rod (B) from the rod holder (C). Remove the lock knob (D).
Fastener Locations : Screw, 3
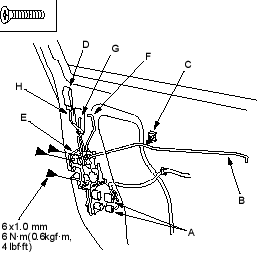
- Remove the screws, then remove the latch (D) through the hole in the door. Take care not to bend the outer handle rod (E), cylinder rod (F), lock rod (G), and inner handle rod.
- Install the latch in the reverse order of removal, and note these items:
- Make sure the actuator connectors are plugged in properly (with power door lock), and each rod is connected securely.
- Make sure the door locks and opens properly.

