NOTE:
- When prying with a flat-tip screwdriver, wrap it with protective tape, and apply protective tape around the related parts to prevent damage.
- Have an assistant help you when removing and installing the dashboard.
- Take care not to scratch the dashboard, body and other related parts.
- Put on gloves to protect your hands.
- If equipped, make sure you have the anti-theft code for the radio, then write down the frequencies for the preset buttons.
- If equipped with airbags, disconnect the negative battery cable, and wait at least 3 minutes before beginning work.
- Remove these items:
- Centre console (see page 20-73)
- Driver's dashboard lower cover (see page 20-75)
- Driver's dashboard under cover (see page 20-76)
- Passenger's dashboard lower cover (see page 20-78)
- Glove box (see page 20-79)
- Kick panels, both sides (see page 20-64)
- Front pillar trim, both sides (see page 20-64)
- Steering column (see page 17-9)
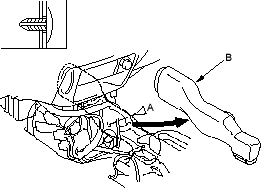
- From under the centre dash, remove the clip (A), then remove the rear vent duct (B).
LHD:
| Fastener Locations |
A  : Clip, 1 : Clip, 1 |

RHD:
| Fastener Location |
A  : Clip, 1 : Clip, 1 |